【算法介绍】
随着城市化步伐的加速,交通流量的激增让交通安全问题愈发严峻。交通违规行为不仅频繁引发交通事故,更对城市交通管理和公共安全带来了巨大挑战。为积极应对这一难题,智能交通系统的构建变得愈发关键。近年来,深度学习技术的飞速发展,特别是YOLO(You Only Look Once)系列目标检测算法的崛起,为交通违规行为的自动检测开辟了新路径。
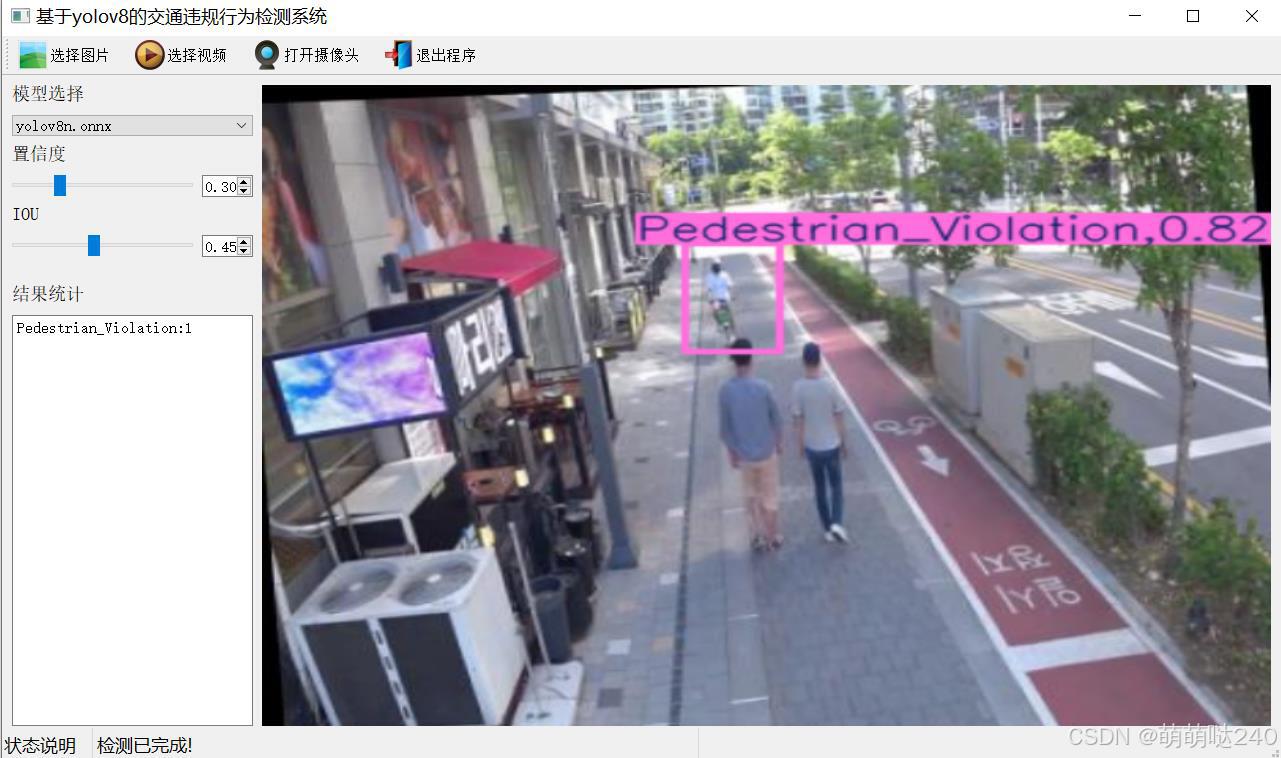
本研究聚焦于利用改良的YOLOv8模型,打造一个高效的交通违规行为检测系统。我们精心构建了一个包含4662张图像的数据集,覆盖了行人违规过马路、行人非法进入斑马线、未佩戴安全头盔、正常行驶、乘客违规以及交通信号灯违规等多种交通违规类别。这一丰富多样的数据集为模型的训练提供了坚实基础,有助于提升检测的准确性和泛化能力。该数据集包含七个主要类别,涵盖了多种交通违规行为,具体包括:Crossing_Violation(越线违规)、Crosswalk_Violation(人行道违规)、Helmet_Violation(未佩戴头盔违规)、Normal(正常行为)、Passenger_Violation(乘客违规)、Pedestrian_Violation(行人违规)以及Trafficlight_Violation(交通信号灯违规)
通过对YOLOv8模型的优化,我们力求在保持其高效检测速度的同时,进一步增强模型对各种交通违规行为的识别精度。此系统的实施将为交通管理部门提供强有力的实时监控和数据分析支持,同时向交通参与者发出安全警示,助力提升交通文明与安全意识。此外,这一基于深度学习的交通违规行为检测系统也为智能交通系统的未来发展奠定了坚实基础,推动了交通领域的全面智能化。因此,本研究不仅具有深远的理论价值,更具备广泛的实际应用前景。
【效果展示】
![]() 编辑
编辑
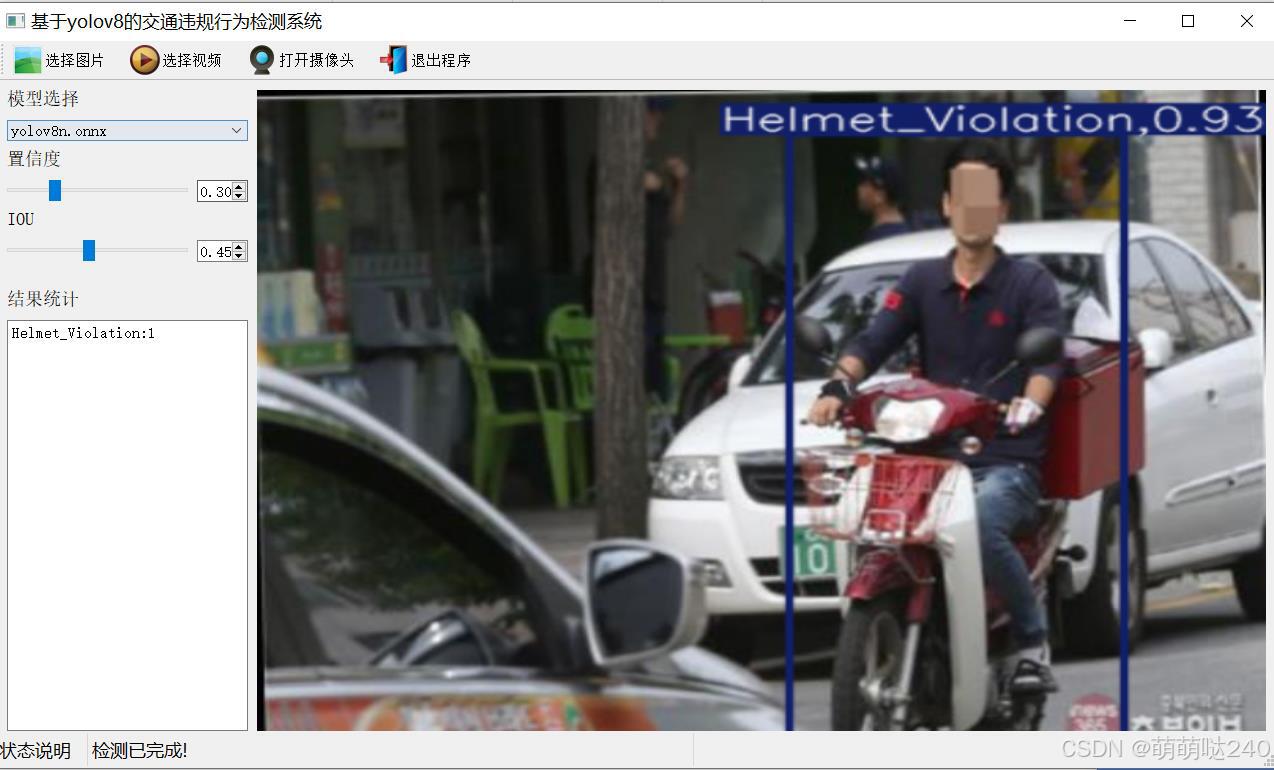
![]() 编辑
编辑
【测试环境】
windows10
anaconda3+python3.8
torch==1.9.0+cu111
ultralytics==8.3.21
【模型可以检测出类别】
Crossing_Violation(越线违规)、Crosswalk_Violation(人行道违规)、Helmet_Violation(未佩戴头盔违规)、Normal(正常行为)、Passenger_Violation(乘客违规)、Pedestrian_Violation(行人违规)以及Trafficlight_Violation(交通信号灯违规)
【训练数据集】
[数据集][目标检测]智慧城市-交通违规行为检测数据集VOC+YOLO格式4662张7类别-CSDN博客
训练信息】
参数 值 训练集图片数 4195 验证集图片数 467 训练map 99.5% 训练精度(Precision) 99.1% 训练召回率(Recall) 98.6% 验证集测试精度信息
Class
Images
Instances
P
R
mAP50
mAP50-95
all
467
500
0.991
0.986
0.995
0.765
Normal
59
68
1
0.991
0.995
0.734
Passenger_Violation
37
37
0.992
1
0.995
0.856
Crosswalk_Violation
108
108
1
0.992
0.995
0.735
Crossing_Violation
88
88
0.998
1
0.995
0.695
Helmet_Violation
41
44
0.966
1
0.994
0.865
Pedestrian_Violation
111
129
1
0.958
0.995
0.723
Trafficlight_Violation
26
26
0.98
0.962
0.993
0.745
【部分实现源码】
class Ui_MainWindow(QtWidgets.QMainWindow):
    signal = QtCore.pyqtSignal(str, str)

    def setupUi(self):
        self.setObjectName("MainWindow")
        self.resize(1280, 728)
        self.centralwidget = QtWidgets.QWidget(self)
        self.centralwidget.setObjectName("centralwidget")

        self.weights_dir = './weights'

        self.picture = QtWidgets.QLabel(self.centralwidget)
        self.picture.setGeometry(QtCore.QRect(260, 10, 1010, 630))
        self.picture.setStyleSheet("background:black")
        self.picture.setObjectName("picture")
        self.picture.setScaledContents(True)
        self.label_2 = QtWidgets.QLabel(self.centralwidget)
        self.label_2.setGeometry(QtCore.QRect(10, 10, 81, 21))
        self.label_2.setObjectName("label_2")
        self.cb_weights = QtWidgets.QComboBox(self.centralwidget)
        self.cb_weights.setGeometry(QtCore.QRect(10, 40, 241, 21))
        self.cb_weights.setObjectName("cb_weights")
        self.cb_weights.currentIndexChanged.connect(self.cb_weights_changed)

        self.label_3 = QtWidgets.QLabel(self.centralwidget)
        self.label_3.setGeometry(QtCore.QRect(10, 70, 72, 21))
        self.label_3.setObjectName("label_3")
        self.hs_conf = QtWidgets.QSlider(self.centralwidget)
        self.hs_conf.setGeometry(QtCore.QRect(10, 100, 181, 22))
        self.hs_conf.setProperty("value", 25)
        self.hs_conf.setOrientation(QtCore.Qt.Horizontal)
        self.hs_conf.setObjectName("hs_conf")
        self.hs_conf.valueChanged.connect(self.conf_change)
        self.dsb_conf = QtWidgets.QDoubleSpinBox(self.centralwidget)
        self.dsb_conf.setGeometry(QtCore.QRect(200, 100, 51, 22))
        self.dsb_conf.setMaximum(1.0)
        self.dsb_conf.setSingleStep(0.01)
        self.dsb_conf.setProperty("value", 0.25)
        self.dsb_conf.setObjectName("dsb_conf")
        self.dsb_conf.valueChanged.connect(self.dsb_conf_change)
        self.dsb_iou = QtWidgets.QDoubleSpinBox(self.centralwidget)
        self.dsb_iou.setGeometry(QtCore.QRect(200, 160, 51, 22))
        self.dsb_iou.setMaximum(1.0)
        self.dsb_iou.setSingleStep(0.01)
        self.dsb_iou.setProperty("value", 0.45)
        self.dsb_iou.setObjectName("dsb_iou")
        self.dsb_iou.valueChanged.connect(self.dsb_iou_change)
        self.hs_iou = QtWidgets.QSlider(self.centralwidget)
        self.hs_iou.setGeometry(QtCore.QRect(10, 160, 181, 22))
        self.hs_iou.setProperty("value", 45)
        self.hs_iou.setOrientation(QtCore.Qt.Horizontal)
        self.hs_iou.setObjectName("hs_iou")
        self.hs_iou.valueChanged.connect(self.iou_change)
        self.label_4 = QtWidgets.QLabel(self.centralwidget)
        self.label_4.setGeometry(QtCore.QRect(10, 130, 72, 21))
        self.label_4.setObjectName("label_4")
        self.label_5 = QtWidgets.QLabel(self.centralwidget)
        self.label_5.setGeometry(QtCore.QRect(10, 210, 72, 21))
        self.label_5.setObjectName("label_5")
        self.le_res = QtWidgets.QTextEdit(self.centralwidget)
        self.le_res.setGeometry(QtCore.QRect(10, 240, 241, 400))
        self.le_res.setObjectName("le_res")
        self.setCentralWidget(self.centralwidget)
        self.menubar = QtWidgets.QMenuBar(self)
        self.menubar.setGeometry(QtCore.QRect(0, 0, 1110, 30))
        self.menubar.setObjectName("menubar")
        self.setMenuBar(self.menubar)
        self.statusbar = QtWidgets.QStatusBar(self)
        self.statusbar.setObjectName("statusbar")
        self.setStatusBar(self.statusbar)
        self.toolBar = QtWidgets.QToolBar(self)
        self.toolBar.setToolButtonStyle(QtCore.Qt.ToolButtonTextBesideIcon)
        self.toolBar.setObjectName("toolBar")
        self.addToolBar(QtCore.Qt.TopToolBarArea, self.toolBar)
        self.actionopenpic = QtWidgets.QAction(self)
        icon = QtGui.QIcon()
        icon.addPixmap(QtGui.QPixmap(":/images/1.png"), QtGui.QIcon.Normal, QtGui.QIcon.Off)
        self.actionopenpic.setIcon(icon)
        self.actionopenpic.setObjectName("actionopenpic")
        self.actionopenpic.triggered.connect(self.open_image)
        self.action = QtWidgets.QAction(self)
        icon1 = QtGui.QIcon()
        icon1.addPixmap(QtGui.QPixmap(":/images/2.png"), QtGui.QIcon.Normal, QtGui.QIcon.Off)
        self.action.setIcon(icon1)
        self.action.setObjectName("action")
        self.action.triggered.connect(self.open_video)
        self.action_2 = QtWidgets.QAction(self)
        icon2 = QtGui.QIcon()
        icon2.addPixmap(QtGui.QPixmap(":/images/3.png"), QtGui.QIcon.Normal, QtGui.QIcon.Off)
        self.action_2.setIcon(icon2)
        self.action_2.setObjectName("action_2")
        self.action_2.triggered.connect(self.open_camera)

        self.actionexit = QtWidgets.QAction(self)
        icon3 = QtGui.QIcon()
        icon3.addPixmap(QtGui.QPixmap(":/images/4.png"), QtGui.QIcon.Normal, QtGui.QIcon.Off)
        self.actionexit.setIcon(icon3)
        self.actionexit.setObjectName("actionexit")
        self.actionexit.triggered.connect(self.exit)

        self.toolBar.addAction(self.actionopenpic)
        self.toolBar.addAction(self.action)
        self.toolBar.addAction(self.action_2)
        self.toolBar.addAction(self.actionexit)

        self.retranslateUi()
        QtCore.QMetaObject.connectSlotsByName(self)
        self.init_all()
![]()
【使用步骤】
使用步骤:
(1)首先根据官方框架ultralytics安装教程安装好yolov8环境,并安装好pyqt5
(2)切换到自己安装的yolov8环境后,并切换到源码目录,执行python main.py即可运行启动界面,进行相应的操作即可
【提供文件】
python源码
yolov8n.onnx模型(不提供pytorch模型)
训练的map,P,R曲线图(在weights\results.png)
测试图片(在test_img文件夹下面)